Wednesday, March 12, 2008

Rebuilding a 9 Bolt, 7.75” Borg Warner Cone Style Posi

This is basically a cleaned up version of a post that I made on thirdgen.org, the title links to the original thread. Like in other cases, I got a number of requests to put it back together with pictures, so here it is.

As always, the pictures are all clickable for a larger version.


Rebuilding the posi: There are pretty good, detailed instructions in the FSM and in the tech section on this site ( thirdgen.org ). Look them up, they’re a good start.

I’ll add a quick nutshell description and note where I did things differently/suggestions:

Disassemble: unbolt the axle retainers, pull the axles, pull the center section cover, remove the bearing caps (make sure that you remember what side everything came from so you can put it back like it came out), pop the carrier/ring gear assembly out of the housing. Note, this will require some prying and turning and make sure you save the side preload washers/shims so you can reinstall them like they came out. Be careful with them, they are machined out of a cast piece and can be brittle.

To perform the rebuild you need some kind of fixture to hold an axle. I took a chunk of wood, cut 2 shoulders to sit on top of my vice jaws, drilled a hole through the middle and then sliced it in half on the table saw to make some clamp/vise pads for the job:


Through the whole deal use the axles as alignment tools.


Before you disassemble it check this spot out:


It’s hard to see in that pic, but if the end of the cone is contacting the end of the case there your case is worn out of spec and you’ll either have to do some machining to it to make it work or get a new case.


With it sitting on the bottom axle, housing bolts up, unbolt the smaller, center bolts and pull the end of the housing/ring gear off.

When you do that you’ll see this (except you’ll have it in the case side, not the ring gear side like in this pic):


If you lift the spider/cross/preload spring assembly off you’ll get this:


If you lift that side gear out of the end of the case you’ll see the pocket in the side cone where you put the shims, there will be one on each side of the case between the side gear and the cone (unfortunately I don’t have a good picture). You can use any shims that are small enough to drop into the machined area between the 2 and still fit around the axle. I usually use 10bolt or ford 8.8” pinion shims. Actually, the last time I think I just stopped by the local machine shop and got a stack of whatever left over shims they had approximately the right diameter.

* This is where I differ from the instructions on the site or in the FSM, forget measuring clearances or anything else, just load both pockets with as much shim as you can get in there and still reassemble the case completely. I’ve never seen one of these get so tight it doesn’t work right (if anything you’ll want it tighter, not looser) and you’ll be kicking yourself if you do any less and start spinning one wheel again sooner then you had to. The shim packs will probably have to be the same thickness on both sides.

From there the reassembly is the opposite of the disassembly, just make sure that you have both axles installed and fully bottomed before torquing all the bolts, if you don’t line up the splines in the side gears and cones before then it’ll be next to impossible to do with it assembled.

Now if the case is worn out of spec, you can still usually get some life out it. What happens is that there are some rings machined into the end of the cones and the case to contact if the case is worn down too far, if you cut them down you can get some extra life out of it.

This is what it looks like if the cone and case ends are worn to the point where they’re grinding into each other, case side. The numbered parts were originally put in for something else, but they do point out the points that are contacting and wearing that aren't supposed to:


Cone side:


What I’ve done before is machine those down till they no longer contact (as a matter of fact, I think I machined them down till I had over .125” clearance). Again, case side:

Cone side:

FWIW, I did the inside of the case on a drill press with a surfacing disk and I did the cone side with an angle grinder by hand, just played with them till I got them within about .005 of flat… If I remember right I ended up cutting close to 1/4" total to make sure that everything fit (yes, this thing was way outside of spec, and yes, it still worked well after all this).

Eventually, after a few more rebuilds the cones/case will wear enough that they get too thin, and I started getting cracking around the opening that I mentioned to check above to see if it’s worn past spec. When that happened I pulled it all apart, bevel ground the sides of the cones, centered them up in the housing using the axles and welded them in, like this:


Monday, March 10, 2008

Bending Box Sections

(as always, all the pictures are clickable)

So the Deker said onto me: “do you know of anyone that can bend box stock out of flat sheet metal? Can you do it with your press brake?”

(press brake:

more on this later)

Without much thinking I responded something like “Sure, why not? Pressbrake, big steel 20ton crushy thing. Good tool of destruction and changing the shape of things that don’t like to change shape…” (I can be quite eloquent sometimes when I’m not mumbling something incoherently. I mostly do that at work because they heard what I was mumbling…)

He went on to describe how when they’ve been making Damascus billets they’ve been putting the steel into a steel box, sealing it up to weld it together and if the box could be made of the same steel that they’re making the knife blade out of it would save them the hassle of cutting it off the blank after they forge weld/hammer it. Real metal fab/machine shops were mentioned…

Huh, this is starting to sound like a challenge. I end up doing a lot of things just because I can when someone else doesn’t think so or can’t…

So later when I got home I thought about it some more and I could think of a few ways to do it that seemed kind of ugly and brutish but wasn’t sure what would be the results. Of course, I have a way with ugly and brutish, (or is that dumb luck? I keep forgetting) and the first thing I tried that I really expected not to work too well came out quite acceptable:

All I did is mark 4 sections and threw it in the press brake, bent the two ends up first making a U twice as wide as it was high, then making the middle bend around the head of the press brake. The worst part about it is that I had to hammer the piece off of the head of the press brake when I was done.


That’s a 2.5” square, it looks like I could go as small as 1.5” or so with the dies that I have but with a smaller bottom die I could get sharper corners (those are roughly 3/16” radius). I have roughly 22.5” capacity, which is more than long enough.

Unfortunately in the process, I broke my 4x6 horizontal/vertical band saw (more accurately, the blade guides that were threaded into the thinnest part of the casting stripped their threads out), so in the process of further modifying, redesigning, and replacing bits of it (more on that later also) I ended up needing to test it so I cut some end pieces.

The next thing I know I found myself in the basement with this thing clamped down on the drill press and the wife shaking her head “you’re not actually…”

“Yep”

I even made patterns for it so I can reproduce it exactly ;)

Thursday, February 28, 2008

The Dog Ate... WHAT? Part II

Deker’s alternate title: My dog ate my......mail truck?

I said it last time, here it comes again… this is one of those, “you gotta see it to believe it” things…


In part one we had a brief introduction to Deker and Judge. Well, here is judge, isn’t he a handsome pup?


And here he is playing with deker’s other dog, Justice:

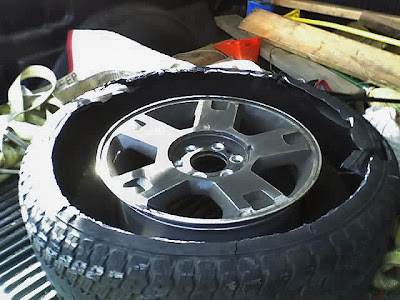
I’ll skip the picture of Deker, the dogs are more photogenic anyway, but how about a sample of their work (and there's 3 more just like it):

Yesterday I got a call from Deker about him leaving work, something about a mail truck stuck in his driveway. I just don’t know what else to say (every time I try I end up laughing)… just click on the link to see the whole story or I’ll copy the text here in case the link goes away:

Dogs hold mail carrier 'hostage'
By STEVE MARRONI
Evening Sun Reporter
Article Launched: 02/28/2008 10:36:52 AM EST

Maybe the theory comes from cartoons, but it's generally believed that dogs and mailmen are archenemies.

That theory was tested Wednesday in West Manheim Township.

Police responded to 960 Grand Valley Road after rural-route letter carrier Robin Barton called from her cell phone, telling police she was trapped in her vehicle.


Barton, who usually does not cover that route, drove up the long, steep driveway to the Dekelbaum residence to deliver a package. As she turned around at the top of the hill near the house, a Rottweiler and a pit-bull mix attacked her Jeep Cherokee.


"Yes, I was frightened," she said later.


Barking and growling, the dogs ran around in a fury and attacked her tires. They snipped, bit and snarled and flattened three of them. The owners were not home to round up their dogs, and Barton was trapped.


The dogs, Judge and Justice, stayed in the yard, not letting her go.


An underground electronic "fence" kept them from leaving the yard, owner Stephanie Dekelbaum said later.

When West Manheim Police pulled up the driveway, the dogs charged the cruiser, barking and striking at one of the tires. Police pulled back down to the road so as not to get stuck there with Barton.

Police Chief Tim Hippensteel said he had never seen anything like it before.


Two police cruisers were parked at the bottom of the hill. Judge and Justice stood watch over the Jeep. The canines had the high ground, but were stuck there because of the electronic fence.

It was a standoff, and they had a hostage.

Police couldn't reach the homeowners. The only way to save Barton now was to bring in an expert, Hippensteel said. They called animal control officer Terry Hemler.


The plan, he said, was for Hemler to shoot tranquilizers at Judge and Justice. With the dogs unconscious, they could bring in a tow truck to haul out Barton's jeep, rescuing her and ensuring the 10 houses left on her route would get their parcels that day.


Tranquilizers were not needed, though. Dekelbaum drove her yellow Mustang down the road, and was surprised to see two police cruisers, with flashing lights, and an animal control truck outside her house.

She pulled up the driveway, got out of her car, and the dogs turned instantly from Cujos into happy, bounding puppies.

"They're generally sweethearts," she said, blaming a recently acquired tire toy for the attack on Barton's vehicle.


The dogs followed her into the house, frolicking and playing, glad their owner was home.

And Barton was free.

Despite being trapped for nearly two hours, she still likes dogs. In fact, this letter carrier breaks the stereotype about dogs and letter carriers. She raises beagles.


Dekelbaum apologized, and Barton left with acting postmaster Bobbi Pfaff to finish her route.

Saturday, December 15, 2007

Sawing Pork

What do you do when you have a 6lb pork iceberg and really need 2, 3lb blocks? How about when you find that your razor sharp you can shave with it hatchet is not enough to go through some hunk of flesh? How do you make a fine, powdery swine snow that will make your rottie puppy think she’s in heaven? What is the correct blade for cutting frozen blocks of meat? How do you supply your neighbors with plenty of reasons to say “what the heck is he doing now?” How do you send your wife running for hot mits while covered in pork?

Well, for these and other questions that you don't dare to ask your mother…
YOU’VE COME TO THE RIGHT PLACE!

A Super Sawzall + 10” Craftsman, rough cut pruning blade will saw through that 6lb porksicle like buttah…

BTW, the hatchet probably would have worked but after a few swings I came to the conclusion that the swing that it would take to go through cleanly would have probably broken the counter. I wonder why they didn’t build that thing right in the first place…

Now where is that free-loading cat?

Friday, December 14, 2007

Making a Non-AC Heater Box for 3rd Gen F-Bodies


ALL RIGHT ALL RIGHT ALREADY

You guys have my attention.  

There are at least 3 threads out there now with “where did your non AC heater box pics go” since the server that was hosting them crashed and burned… honestly I never expected anyone to miss them.

Anyway, lets discuss this for a second, put up some info on how I made it and some pics.  I’ll have to apologize ahead of time: the whole thing might be a bit disjointed, especially the pictures, since I’m taking it from 3 different places. I’m also sadly missing the pictures of the actual fiber glassing since between the resin that sticks to everything and the very abrasive dust generated cutting and sanding ‘glass I probably would have destroyed a camera.

For those of you that aren't coming from the assorted forums looking for this- some quick background. Basically, for a whole slew of reasons the 3rd gen f-body guys have been getting rid of their air conditioning style heater boxes, “my AC doesn't work and I don’t feel like converting to a new refrigerant,” just to clean up the engine bay to get rid of some clutter, make room for modifications or because it’s more of a race car and what does a race car need AC for? For those of you asking why does a race car need heat either I’ll say for a consistent drag car you need consistent engine temps, with a heater you have a ready built, small radiator and fan assembly to use for just that; that and to keep your hands warm on those mineshaft, incredible conditions "this thing will run the best times ever," nights- ask my brother, he removed his and now drives to the track with a little electric heater and his hands between his knees looking like he's doing something he shouldn't at stop lights.

In my case I originally did it because:
  1. It didn’t work
  2. It was extra weight in a car that I owned for no better reason than to go faster
  3. It took up tons of space in a place that I could use for a turbo down pipe.
To give you some idea, here are a few pics of my “new” project car with it’s complete AC box.  Not only is it impressively large (it’s really about 2x what you see in the pictures, you can’t see the bottom half that extends almost all the way down to the frame rail, hell, you can’t see the frame rail, the firewall, and you can’t get to a large part of the engine on that side), but all the stuff around it is actually connected to it.

In contrast, here is my older car which has now become a parts car that has my box in it. There is actually more wiring harness around it because this car has been converted to use a different ECM, programming and 2 barr MAP sensor (mounted on the firewall above the air box with the green plug), and you can see what an enormous difference it makes, you can see all of that side of the engine, the firewall, frame rail…

Now there is another solution. A few f-bodies came from the factory without AC, but this has it’s problems also. The non AC boxes were borrowed from the S10’s and were steel, unlike the FRP (Fiber Reinforced Plastic) AC ones, and the steel ones just didn’t look right, they stuck out like a sore thumb. They also had a smaller fan housing, which used a smaller fan and motor which were setup for 3 speeds as opposed to the 4 that the rest of the setups have, meaning different wiring and dash pieces that you have to dig up somewhere. Lastly, this is the big one, they’re not that rare, but people have gone insane with their prices. You can find them pretty readily on ebay or assorted message board sale boards, but I’ve seen dented and rusted out ones going for $150-300.

So there’s a perfect reason to waste a bunch of my non-existent free time stinking up the house and killing a few of my dangerously lacking brain cells with fiberglass resin. Lets get dirty!

Actually, first a quick note about the design (sorry for the false start). This thing would have been much easier to make with some pleasant curves and nice lines and usually somewhere in that universe you hit an elegant state of “form follows function,” but that was not one of the goals here. I wanted something hard and angular, with the occasional awkward curve, like the original box it was replacing. The idea was that it should fit in. I’ve had guys very familiar with these cars closely inspect around under the hood trying to figure out how I made so much space on that side never even noticing the “different” heater box. This is a case of “form follows GM.”

So here is what I started with:

There’s 2 significant things here that you might not immediately realize. First is that the AC fan box is the right size and fits the 4 speed fan that we want and has the shape that we want, so lets use part of it… I found a convenient place to cut it from the rest of the box. Second, I took a piece of cardboard and made a pattern for the base plate. One that covered all the necessary holes in the firewall…. Once I had a shape I liked the fan box got taped to the top of it (you might be able to see it better from this angle:
At this point I had to work out the rest of the shape, and cardboard was the perfect medium. I took a piece and scored it to make the hard, square corners, glued/taped it down to the cardboard base plate and added whatever shapes I needed to make the thing up. At this point I took and blended/sanded/ground the fan box edges so it’s shape flowed smoothly into the rest of it.

Now to use the whole thing as a plug mold, as you can see in the pictures it needed a shiny surface, it got wrapped in duct tape. Without a shiny surface the fiberglass would have never released from it. The whole assembly then got stapled to a big sheet of plywood which was wrapped in plastic wrap (again, the resin won’t stick to shiny smooth surfaces). If I really intended this thing to be reusable for multiple uses I would have given it a heavy coat of shiny paint or gel coat to make it shinier and less sticky to the resin.
Next the whole deal got slathered with a few heavy coats of car wax to act as a mold release. You can use proper mold release, but anything that gets a good layer of wax where you don’t want things to stick will work.

Now this is where the fun part started, basically I put on layers of resin and ‘glass cloth, carefully pressing them down to squeeze all the excess resin out and to make sure that the cloth was tightly following the lines. Since this thing had all these different shapes and cloth doesn't stretch like mat does I used it in strips, kind of like paper mache.

The 2 layers of glass gave me a light, thin, and adequately strong part to work with. The more layers I’d put on top of the plug mold the more it would cover/obscure the shape of the part, so at this point I popped it off the mold… well, more accurately, since the mold was not totally smooth I pulled up on it and the mold came up with it, pulling the staples out of the wood. The mold stuck where the edges of the tape was, but I wasn't really stressed about it, and broke it up and pulled it out (again, if I meant it to be reusable I would have given it a heavy coat of shiny paint).

At this point I went to turning it into a useful part. 

The base plate put a ridge around the lower inside of the part which was easy to follow to cut out and sand to shape. From there I gave the part it’s structure by applying multiple additional layers off ‘glass mat (it’s easier to form into intricate shapes) mixed with cloth (stronger, lighter, really not necessary for this, I ended up with a part that was super light but strong enough for me to stand on) to the INSIDE of the part.
I didn't care at all about the finish on the inside of the part, but the outside I did. I gave the outside a single, thin layer of mat/resin since mat has a random pattern to it and doesn't have the same tendency to “print through,” as cloth. Then I did what I consider “cheating” the final finish, saving me a good deal of the sanding and other finishing that I would need otherwise by taking some bondo body filler, mixing it with some ‘glass resin (both are polyester based products) and spreading that thinned out goop across the top surface of the part, letting it smooth itself out.

What was left was sanding, sanding and more sanding, some paint and finally cutting out and drilling the holes for the motor/fan assembly and the coil assembly (plate that screws to the top of the duct to cool the coils used for fan speed control).  Slap it together and you’re ready to go.

This is what it ended up looking like (before cutting out the hole for the fan speed coils):

Here is a view from the inside assembled:

And finally, a view from the top assembled, with the motor cooling hose installed, all screwed up, ahem, together:

Wednesday, December 12, 2007

Dayton SA240 240W Subwoofer Amplifier Bass Boost Modification


Well, it was time, I got tired of using a test rig to power a subwoofer I built years ago so I decided to go with something better.

For a lot of people Parts Express is pretty much the standard for DIY speaker building supplies and their Dayton subwoofer amps have become pretty much the standard for powering home built subs. I decided the biggest of their old school, original series amps, the SA240, 240W one was the way to go. It helped that it was on sale for $99.

Anyway, the amp is available in a couple of different versions, one that supposedly has a flat response curve and the more popular version that has a 6 dB bass boost at 30Hz. I probably would have just ordered the one with the bass boost considering I’m using a sub that has what amounts to a tiny driver (8”) in a huge room (if I remember right it’s something like 19’ x almost 30’), but as luck would have it, they were out of stock. What do you know, I plug it in and decide “Yup, I think I’ll need to play with the bass boost settings.”

Interestingly, Parts Express is quite willing to provide information about choosing component values to change settings, but at the same time a lot of people tend to complain that they are too difficult to modify. For those of you out there debating about the thing, I decided to take a few pictures and put up a quick description so you can decide yourself if this is something you want to get into. Since I’ve build a few speakers and am always changing things and “voicing” different combinations of driver, enclosure, source… combinations, that of course means that I need to over complicate the solution so I don’t have to rip the whole amp apart every time I want to change something.

So here’s a chart of the documented settings for the amp:


Simple enough, change 2 resistors and it does something different, so let’s have at it.

The resistors are located at the center of the pre amp board, the board that has the crossover frequency and gain knobs on it as well as the RCA jacks. To get it out you need to remove the 4 main case screws, disconnect 2 jumpers, one going to the line level jacks and the second going to the main amp board, and then remove the screw that holds it to the back of the face plate, a second screw that comes in through the front of the face plate in the middle of the RCA jacks, the 2 knobs and the nuts and washers holding the pots to the front face. This is all pretty straight forward and if you’re worried about that part than don’t even consider doing the rest. The worst part is that the output wire is glued to its hole in the back of the case limiting the amount of room you have to work around inside.

So once you have it out it looks like this:


I realized that I don’t really have anything that gives you a good sense of scale with these things, well to give you some idea the big monster looking resistors on the bottom left are your typical ½ watt resistors, usually you don’t see them much smaller than this unless you’re talking about surface mounts.

So here are the buggers we’re after, they’re almost right in the middle of the board:

And no, I don’t know who the rocket scientist was that decided to put the capacitor lead right over the top of one of them, and yea, it’s at least as much in the way as it looks in that picture, probably more.

Here is my solution to only having to disassemble this thing once and still be able to tinker with it. Instead of desoldering the resistors and replacing them with the new ones, instead I replaced them with sockets making them easily removable.

Actually, I should give credit to my brother, these were his idea. These are pins used to make IC sockets. I was originally going to use the pins that you use to make computer cable “DB” style ends, which are very similar but taller.

People will give you all sorts of suggestions about the best/neatest way to desolder stuff like this, and I’ll admit, I tried some desoldering braid to start with but got nowhere with it. Not being much of an electronics freak, I didn’t have the typical desoldering irons or even a proper soldering station, so I ended up just flipping the board over in a Tupperware (to give the board that sticks out off of it somewhere to go), grabbing a generic 30watt Weller soldering iron and just heating the pins and pushing them through their holes till the resistors fell out.

To put the pin sockets in I put the socket in the hole and while holding the board in my hand and using my forefinger to push a toothpick up against the socket holding it in position on the board and feeding in solder and the iron with whatever limbs I had left over.

The end result looked sort of like this from the back:

(look towards the center of the board and you’ll see a few solder joints with dark flux around them, the flux was eventually cleaned off before the board was put back in the amp).

From the top you can see the sockets, and you can also see the R35 and R36 labels on the board where the resistors have been removed. You can also see the lead from the previously motioned capacitor carefully bent around the bottom right socket:


And finally a picture with some 1/4watt, radio shack resistors installed (if you know what a normal, small resistor looks like this picture might give you some sense of scale, one set of the pins had to be bent back under the resistor to fit in the socket spacing. I purposely left the leads on the resistors a little longer to allow for easier insertion/removal during testing, and when I finally decide on what values I like I’ll probably put little tape over them or a dab of glue if I have any indication that they might vibrate out (I really doubt it).

Tuesday, November 27, 2007

How Tacky is That?

ZDNet's all-in-one LCD PC


So what exactly is so special about this thing? 2 pieces of hardboard, 2 1x slats with some cheap computer hardware screwed to the back of an LCD, held together with what looks like drywall screws. Looks like something a high school kid would make as a "look at my cool custom PC" project or a slightly cleaned up version of the "pile of junk I was trying to fix" that you can find in every IT guy's office from time to time.


If he was going to publish this on such a well known site the least he could have done is maybe cut a ROUND fan hole (or any regular shape that the fan would fit in), made some straight cuts, maybe extended the sides to cover the gap between the back and the box so it really looks like it was meant to be one piece…


Though it does give me an idea. Skip the LCD, spend a little more on the video, make the case look like it was built by someone with more talent than a 3y/o using the claw end of a claw hammer (maybe bend a nice steel or aluminum cover with a plasma cut detail/plexy window or at least finish the wood nicely) and you have a nice, component sized multimedia PC to plug into your TV/stereo (I know, "home theater").

Wednesday, October 24, 2007

Removed

(original content removed by request of the individual who it
was about)

In The Beginning

There was nothing.

Isn't it amazing how with all the sound and fury that appear to be part of life how it often amounts to heaping piles of nothing?

For a long time there was nothing, I setup this space a LONG time ago... but why?  No car guys read blogs.  People who play with metal don’t read blogs.  I don’t read blogs.

What will I put here?  Why bother? Hell, it didn't even seem to make sense to sit down and consider what to put here.

Well, it wasn't quite nothing, there was a little something, there were mumblings:
“You really should write some of this down and arrange it in one place”
“Man, you have some of the best stories”
“The cat has to go fast, really fast… do you think she needs a helmet?” (This was a real conversation, I'm not making this up)
“What did you do and why is it on fire?”

(you’ll learn, my life involves fire, explosions and twisted little bits of metal… really I don’t understand why more people’s lives don’t, it just seems to happen naturally around here)

And then it happened, a week or so where I had something to comment on almost every day and worse, my wife is out of town. My coworkers are also. The dog… well she’s trying to pay attention, but she’s really just hoping that somehow this turns into a game, and the cat, well that freeloading beast, she’s actually snoring. Cat’s aren't supposed to snore.

So that’s it. I’m here. Let’s see how this goes. For right now the plan is to blog about things as they happen, and then maybe pad those things with older stories, and even occasionally with notes on how something works, how to do something or how I did something if someone asks.

We start with a whimper…