Tuesday, November 30, 2010

Lathe Stand Part 1 – Introduction

This is another one of those “Yea, I’m getting to it” kinds of posts… actually, the whole project is a “Yea, I’m getting to it” kind of project, I guess for me it’s sometimes hard to get to making stuff for my tools, I really just want to use them.

DSC_2594

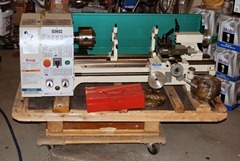
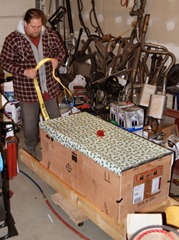
Along those lines, I got a Grizzly G0602, 10x22 metal working lathe almost exactly a year ago now and I’m more than a bit embarrassed that I’ve taken the packing off, cleaned the packing grease off of it and been using it still mounted to the pallet sitting on a furniture dolly for most of the year:

DSC_2608

(I will not show you a current picture of it, just imagine the same picture but surround it with a stack of tooling, boxes and a big pile of swarf and you’ve got it)

After completely and utterly overanalyzing the situation, and then spending some time looking at assorted tool carts, workbenches, and (gasp) even lathe stands I came to the conclusion that nothing was quite right.  I decided that it needed something special.  Or maybe it’s that I’m just too anal retentive to deal with plenty of stuff that would have worked just fine and started yet another project:

  • Height: I’m 6’4” and am prone to back issues, I didn’t want to be hunched over this thing.  Most lathe stands are in the area of 29” tall (damned dwarves…), most work benches and carts are around 34” tall (it’s a conspiracy, the dwarves have taken over).  After asking around I found all sorts of rules of thumb about what works well for a work surface and after pulling out the tape measure, calipers, calculator, and consulting the 2 psychics and the dog I came to the conclusion that I needed something around an inch or 2 over 40”.  Since my adjustable height workbench ended up at 39.75” tall and I’m quite happy working at that on things clamped in the big vice or on a small anvil, both of which roughly simulated the raised work height of the lathe, that became the magic number.  So I’m shooting for 39.75” tall.
  • Overall size: I’m short on shop space (yea, I know, who isn’t), so anything bigger than it has to be is a no go.  Along those lines, I figured that keeping it around 48” wide would give just enough room to put the chip tray on it and allow me to use standard size sheet goods for the top (ended up not making a difference, you’ll see later).  Depth- well, had to be deeper than the chip tray for stability, to give room to open the side cover (which swings back) and eventually I’d like to put a tool cabinet inside and that generally means more than 16”.
  • Structure: I’ve built some nice, sturdy setups out of wood, but there is something to be said for heavy, welded steel.  Nothing to come loose, wiggle, squeak, groan, grunt….  I liked the idea of 3” box uprights and 2” box crosspieces, it just looked right in SketchUp.  I started wanting 1/8” wall, but when I got to the steel yard it turned out that heavier wall was cheaper.
  • Casters?  The machining world says it’s not a good idea to have mobile machining equipment, you’re just asking to knock it out of whack.  My garage says that you need to be able to move this thing because you just don’t have the room.
  • Adjustable feet?  Again, seems to be a conflict here.  Many swear by leveling the machine before you use it.

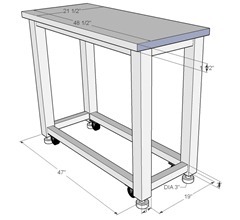
The end result: the stand is going to be 47” wide, 19” deep, and 38-1/4” tall, with a top that ended up getting made of some left over laminate counter top material from remodeling our kitchen glued to a piece of 3/4” MDF, making it 1-1/2” thick with the dimensions of the top of the stand +3/4” maple banding making it 48-1/2” x 20-1/2”.

WRT the feet, of course I took the most complicated approach, and made/mounted adjustable, vibration isolating feet on the ends of the legs and casters inboard, in a fashion so that the feet can be adjusted to lift the stand off the casters and level it, or you can screw them in (or entirely remove them) and wheel the stand around on steel casters, kind of like they use on engine stands.

stand

The next few installments will have build details and pictures.
Friday, November 26, 2010

What To Do With Leftover Turkey

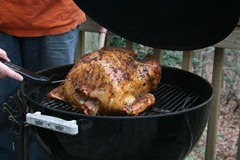
Thanksgiving 2010 001

It happens to all of us this time of year, you make that 20some pound bird, people eat till they can’t breathe much less get up from under the table, you pack goodie bags to send home with everyone, the dog has eaten enough that she’s in a tryptophan coma and just sitting there, farting and burping (we won’t mention the rest of your “guests”) and no matter how good your turkey turned out (and let me tell you, when you get the grill thing working right you won’t do it any other way) you can’t imagine another turkey dinner for the next few days.

So, what do you do???

Well here’s a recipe from a few years back on Epicurious for Turkey and Noodles with Peanut Sauce that will have you lusting after that leftover turkey as much or more than the original dinner.  

YES, I’M NOT KIDDING, IT’S THAT GOOD.

Just because I can’t promise that it will stay up forever at that link I’m going to reprint a copy here. And if you’re going to do it, follow the directions, don’t be one of those “well, I didn’t use this, and substituted that, and well, I wouldn’t make this recipe again, it was weird.”  the one recommendation is that if you’re not into spicy food take out some of the red pepper flakes, it’s as good mild as spicy):

Turkey and Noodles with Peanut Sauce

Yield: Makes 6 servings

Active time: 30 min Start to finish: 30 min (the prep takes all the time, it’s a piece of cake once you gather the turkey…)

Ingredients:

  • 1 lb linguine
  • 3 garlic cloves, finely chopped
  • 1/2 teaspoon dried hot red pepper flakes
  • 2 teaspoons vegetable oil
  • 3/4 cup chicken broth or water
  • 2/3 cup smooth peanut butter
  • 2 tablespoons soy sauce
  • 2 teaspoons sugar
  • 1 teaspoon minced peeled ginger
  • 2 tablespoons fresh lemon juice
  • 1 lb shredded cooked turkey or chicken (4 cups)
  • 4 celery ribs, thinly sliced
  • 1 cup thinly sliced scallion greens

    Preparation:

    Cook noodles in a 6- to 8-quart pot of boiling salted water until tender, about 12 minutes. Reserve 1 cup cooking water, then rinse noodles in a colander under cold water. Drain well.

    While noodles are boiling, cook garlic and red pepper flakes in oil in a small heavy saucepan over moderate heat, stirring, until garlic is golden. Whisk in broth, peanut butter, soy sauce, sugar, and ginger and simmer, whisking, 2 minutes. Remove from heat and whisk in lemon juice.

    Toss together turkey, celery, scallions, noodles, sauce, and (if necessary) some reserved cooking water to thin. Serve immediately.

    Read More http://www.epicurious.com/recipes/food/views/Turkey-and-Noodles-with-Peanut-Sauce-105728#ixzz16hcVN7oQ

  • Friday, November 05, 2010

    Gotta Love Harbor Freight

    OK, before you assume it, I’m not all about cheap tools… AAMOF, I find cheap tools very frustrating, BUT, there are times that they are appropriate, there are times that I’m willing to put some time in to get just what I want (and what difference if I paid a buck for it at HF or $20 someplace else if I’m starting with similar junk before I modify it), and there are times that you can get the same thing for cheap.

    So here’s the same thing for cheap:

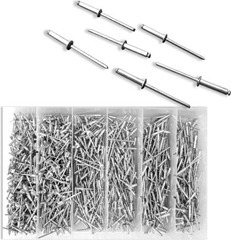
    1000RivetAsst

    Last week I was replacing the cords on a couple of Belkin metal housing surge protectors and found that they were riveted together… I started looking for my rivet gun and realized that I only had a few rivets and no real selection to speak of.  I wanted more for “stock” so next time I have some choices. 

    Tonight I was at Harbor Freight (what I was looking for will turn up here as a project later on) and went through their “assortment” aisle looking for an assortment of rivets.  I looked at the 100 piece assortments for $1.99-$3.00, the 500 piece for around $10, None of those seemed that badly priced, but I remembered that they had a couple of 1000 piece assortments on the clearance section.  It was hard to tell what the price was, if it was originally $12.xx or if that was the clearance price.  Either way, I didn’t need 1000, but if it was less than $13 it seemed to be the deal to go with, so I grabbed one.

    FWIW, the same set is available all over the place online but apparently HF doesn’t list it anymore, the cheapest that Amazon lists them at right now is $29, it’s:

    Rivet assortment includes:
    250 piece: 1/8" x 1/4"
    250 piece: 1/8" x 5/16"
    250 piece: 1/8" x 3/8"
    250 piece: 1/8" x 5/8" rivets

    Anyway, I get to the checkout and he scans the bar code… $.17.  Yep.  That’s right.  Seventeen whole cents.  Ok, $.18 after tax.

    They had 2 on the shelf, they BOTH came home.

    Now, what do I do with 2000 rivets?

    Winking smile